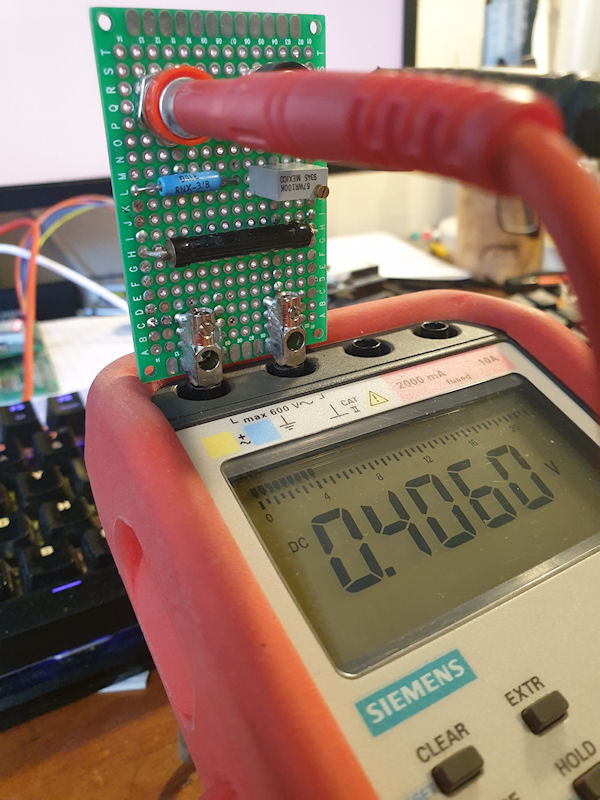
Some time ago I threw together (what I thought was) a 1000:1 voltage divider for measuring the HV on Geiger counters. This consisted of a Dale 1% 1G ohm resistor (R1) mounted all nice in a box with big chunky gold banana connectors and another quality 1% 1M ohm resistor (R2) connected to a banana socket and then a bunch of croc leads flying about. It worked, but wasn't right. I hadn't accounted for the multimeter's own internal resistance (known as a burden on a circuit). I'm pretty sure my multimeter is a 20M ohm resistance, or thereabouts, so that made R2 actually 950K ohm when the meter
Geiger Counters, Radiation, Electronics, Projects and Other Good Stuff
*Please note this site is under construction.*
Welcome to my lab! Here I write about Geiger counter and radiation related things, experiments, projects and general musings.
-
-
Update #5 Progress!!! 😊 MAX7219 LED controller (for common-cathode LEDs) running common-anode 7 segment displays. The brightness isn't quite what I could like, but it should be fine. I may be able to tweak it a little, but the MAX7219 wasn't really designed for running common-anode, so if not, I can't complain. Now to make up a little daughter board with the MAX7219 and try it out for fitment/space etc. If all is good, then I'll make some more and get the display boards retrofitted with the new controllers. This IC will daisy chain too, but I might have to get a little clever with the code as
-
This time I get out my I Never Won A Blue Peter Badge badge, a stack of foam board, some sticky tape, more sticky tape, some hot glue, some recycled fabric insulation stuff from a dishwasher and knocked together a box for insulating the heat absorbing temp sensor. Not much really to say about the construction. I think the pictures say it all. This is the end product and really does appear to work well. It managed to record a temperature of just above 70°C a few days ago. 😯 That's about 20°C more than before it was in the insulated box. It still needs some small tweaking as when I open my
-
Update #4 My head still hurts.... But I am making progress. I have added an RTC ( DS3231 ), a micro SD card and a GPS receiver ( NEO-6M GPS Module ). The RTC is just for keeping time and date. The RTC will be set every hour, or 24, or whenever, to the GPS time. I need to have a think about UTC/BST for recording and displaying. Do I record everything in UTC and have adjustment on display, or do I set the RTC twice a year into UTC/BST and record using UTC/BST. The latter would be the most beneficial for displaying and graph creation, but with a caveat that 1 hour of readings will get screwed up
-
😢 Oh no! The large 40x4 LCD I have is too big for the enclosure I have, and want to use. The next size up enclosure with transparent front is twice the size, so whilst would fit the LCD there would be much wasted space and it wouldn't look right. So I can use a 20x4 LCD that will fit, but only half the display of the big one. I'll use the 20x4 for now and then change to the 40x4 if I find a suitable enclosure. I like the full transparent front and opaque back and sides. Fully transparent and it would look like a glass lasagne dish and I can't see the innards with an opaque front. Having the
-
I have just added 'wind chill' to the mix and seems to be calculating correctly. I had to put in some static numbers for testing as wind chill is only valid when the wind is moving more than 3mph (4.83kph/1.34ms) and the temperature is below 10°C. This is the formula: T_wc = 13.12 + 0.6215 * T_a * (0.3965 * T_a - 11.37) * v^0.16 Where: T_wc is the wind chill in Celsius temperature scale, T_a is the air temperature in degrees Celsius, v is the wind speed in kilometers per hour. This is the output with static wind (10MPH) and temp (9°C): Temperature: 9.00 | Humidity: 45.36 | Dew Point: 0.00 |
-
The sensors are good! The electronics are that is. I've checked over the anemometer, wind vane and rain gauge and all are working properly. They are going to need a little work to get them back to shipshape again and I may even pot them in, although the actual board have fared quite well. Only a bit of dull solder on the wind vane PCB. As you can see form the images all the sensors use good, old, conventional reed relays and a magnet on the spinney bit. I may swap these out for hall effect sensors in the future. One thing I would like is a better resolution for the wind vane. As it stands I
-
About 4 years ago my weather station failed. It was only a cheap WH1080 from Maplin (remember them?), but it did it's job for about 8 years. The sensors were getting a bit janky and then the transmitter stopped working. I managed to find a replacement transmitter in China and that did pair with my receiver, but I think the receiver is also broke, or the two aren't quite compatible as I can't save the settings on the receiver and Cumulus is telling me that it is getting some duff data. Now it lies in pieces as shown in the picture. Next stop.... the scrap bin. Goodbye old faithful cheapo
-
I have been meaning to write an update as I have added a couple of new sensors. One of which is my very own invention - straight from the old grey matter. I have also made some improvements and things seem pretty stable. I have improved the web pages for displaying the data and is now easy to go back and forwards day by day to view the data. For some reason the ESP32 started counting something like 10x the actual counts from the counter. I think this happened after I added an AS7341 sensor, or something. I have had other issues with the ESP32 slowing to a crawl. I guess this is what happens
-
Solar Monitor 5 Million I have been meaning to write this up for a couple of weeks now, and I finally do it. This is an experiment I am conducting (very loosely at present) that came about from leaving my CAJOE RadiationD-v1.1 with J305by on my window sill for a week and noticed a strange pattern with the 'excess' counts. They were stronger in the morning than in the afternoon, even to the point they were stronger than in direct sunlight. I mentioned this to a couple of members here and we all agree that it is strange, and that we all expected there to be more counts in direct sunlight than
-
I knocked up a simple monitor to easily see if radmon.org is up or down. It uses an ESP8266 (Wemos D1 mini clone) and a single RGB LED. It simply polls radmon.org by asking for a response from the server. If it gets the reply it is expecting in a timely manner it lights the LED green. If it doesn't get the reply it wants, or times out, the LED changes to orange and sets a fail counter +1. If it receives the correct reply again it goes back to green, but after 3 consecutive failures the LED lights red. There really isn't much more to it. There are positions in the code where an alarm or
-
I have been testing a new GM tube for the past few days, a Robotron 70 013. Its quite a sensitive tube at around 100 CPM for background count. I got to thinking "would a more sensitive tube last as long as a less sensitive tube" so threw some numbers together to find out. My Initial thought was "if the more sensitive tube clicks more, then surely it wears out faster." I'm comparing the SBM-20 (~20 CPM background) with the Robotron 70 013 (~100 CPM background) The SBM-20 has a life of around 20,000,000,000 pulses. The Robotron has a life of around 60,000,000,000 pulses. That settles it, right?
-
- Posted on
- Featured Image
Below is a list of conversion factors for GM tubes that I have been collating over time. They may come in handy if you are building your own Geiger counter and want to convert from CPM (counts per minute) to μSv/h (micro sieverts per hour.) RH = values from RH Geiger SBM20 0.006315; SBM20 0.0057; - RH SI29BG 0.010000; SI29BG 0.0082; - RH SBM19 0.001500; SBM19 0.0021; - RH STS5 0.006666; STS5 0.0057; - RH SI22G 0.001714; = 583.43 SI3BG 0.631578; SBM21 0.048000; LND712 0.005940; SBT9 0.010900; SBT9 0.0117; - RH SI1G 0.006000; SBM-20 - conversion factor 220 CPM -> 1uSv/h (working voltage- -
I wanted to see if there was much difference between the sensitivity between a SBM-20 and STS-5 tubes. For a background test I had an SBM-20 running for a while then swapped it for a STS-5. I think the graph says it all. (Note - there was a discrepancy with the initial background test (below). The test was repeated later and the results are shown towards the end.) I took this a step further and compared the two tubes using 13 different sources. In hindsight I should have tested a J305 at the same time. It took a surprisingly long time, so I might set up some kind of testing jig and program an
-
It seems of late that getting hold of good GM tubes, for reasonable money is a thing of the past. A single SBM-20 on eBay is going for in excess of £150 ($182) and there are hardly any suppliers left for them. Some years back I paid about £13 for a NOS SBM-20. I wish I had the nous back then to buy a large stock of them. I'd have made good money these days! eBay used to be awash with good GM tubes. Lots of regular types, SBM-20, STS-5, LND-712, SBT10A, SBT11A, pancakes, a bunch of Mullard and then a load of quite exotic tubes. Today there is hardly any of those and is covered with cheap
-
If you are interested in Chernobyl you will love this video. I had only heard of SKALA in the past, but nothing actually about it. This video gives a really good look into SKALA and it's operations. In this episode of Computers of Chornobyl series, we will talk about the mighty SKALA system, that controlled the RBMK reactors. This is the first-ever documentary about its design, architecture, operation, and software. It also tells the story of how it was preserved for posterity and reveals, what is common between it... and a control computer of Apollo spacecrafts. It took us nearly half a year
-
I bought one of these cases from my local Asda for about £14 a few years back. I thought it was that good I went back a week later and they had sold out and they never came back into stock again. I had a little search about on the internet and found them on eBay and Amazon - links below. I bought one from eBay to see if it was the same quality, and it is exactly the same. It is a really neat case. Appears to be very waterproof, even air tight and strong. I think it is made from Polycarbonate. I used mine to house a GPS Geiger counter project some time ago. I think I will use another for an
-
For all of the posts in the Negative Ion Energy Ju-Ju series, click here. I found a new variation of the pendant. A white Ju-Ju pendant. I think there are loads of variations but this seems a new one. I have one on the way so will let you know about it when it arrives. https://www.aliexpress.com/item/4000030351480.html Update: It has landed! This is the latest Negative Ion Energy Ju-Ju pendant. It's kind of pretty. File Attachment: It has some extra goodness on the back - some Germanium stone and FIR stone little dot kind of things. One of the previous stone coloured pendants has 4 little dot
-
I was asked by Gissio to try and download the original firmware from my HFS-P3, so I tried. Alas, no joy so far. ☹️ Under the battery (stuck down with sticky tape) is a pin header. Probably designed to have a pogo pin connector connect to it as there is no room to solder on an actual pin header. I just soldered wires to it directly. I managed to work out the pins by tracing the circuit, but I had to use my microscope as the connections on the MCU really are that small! I took photos of both sides and flipped one then overlaied one over the other so I could line up the vias on the board. You
-
Early afternoon and I hear a mighty humming noise. A swarm of bees had come to visit! 😊 After I had run around the house closing the windows I caught a bit on video. I've never been this close to a swarm of bees. Being behind a window was great as they were super close. I did consider going outside but they moved off shortly after filming them. They also came back a few hours later but didn't hang around and I didn't get my camera in time. I think they may have been mating as there seemed to be two swarms which you can't really see on the video, but that is the reason I moved the camera from


